Showing posts with label Cakes. Show all posts

Tuesday, 29 June 2021

Giraffe Cake- cake for a 1st birthday


2 Chocolate cake baked in a rectangular sheet pan. Sandwich the cakes with chocolate buttercream. Cut the '1' shape out of this after placing the final top layer. (The cake which we cut out for getting the shape can be used to make cake pops). Add a crumb coating to this and keep it in fridge for 1 hour. decorate the cake with yellow and chocolate fondant to get the shape of giraffe 


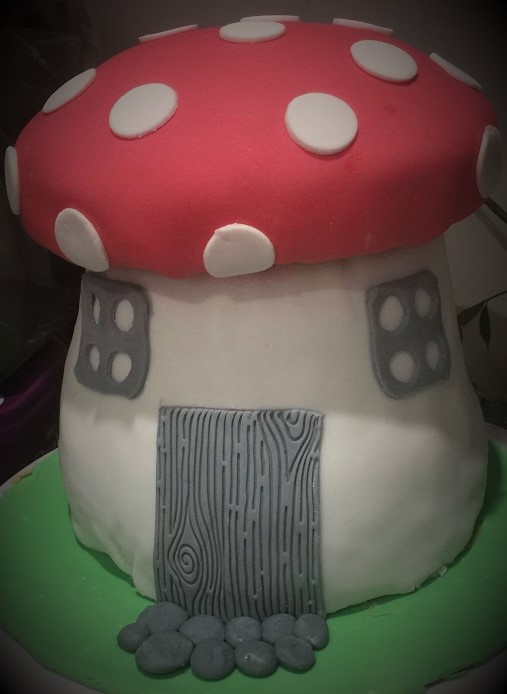
Toad stool cake for my little ones 4th birthday


I made 3 round cakes, 8 inch each, and another one in a not so deep 8 inch bowl (coffee flavored cake). Sandwiched the round cakes with caramel buttercream and carved the shape of toad stool base. Crumb-coat this with same butter cream and then covered it with white fondant. 

Cover the cake stand with green fondant and place the cake layer on top of this. 

Crumb-coat the one baked in a oven safe bowl and cover it with red fondant. Place this on top of the base carefully. 


Now the shape of the toad-stool is almost there. 

Now the decoration part - 

Using wood print stencil, the door details are done. 
For windows, cut 2 square piece from the grey fondant, and using the piping nozzles cut out 4 round from each window. 
With fondant made small flowers, creepers and pebbles. These parts added on the cake.


Thursday, 12 November 2020

Barrel cake for a 40th birthday


A post after a long time. Baked many birthday cakes in between for my kids and friends’ kids. But never got a chance to upload any of it in my blog. I know I am not treating this space the way I wanted when I started the blog. Don’t know when I will be able to restart my pace.

So coming to the post details, this birthday was something we friends were waiting for so long. Cake was my responsibility and I decided to go with the Barrel cake. Along with this cake, the table was filled with so many other attractive and delicious things like cupcakes (40 cupcakes-20 vanila and 20 chocolate),  pineapple table decor with Ferrero Rocher

For this barrel cake, I used coffee cake (made 2 9-inch cake) with caramel frosting and for the barrel look, in brown fondant (white fondant + homemade chocolate fondant) with stencil added the wood look. Ordered personalised cake topper from eBay. Forgot about the wordings on top of the cake while ordering the cake topper. So here is the alternative solution for that; considering the size of the cake, make a thick rectangular piece using white fondant and on top of that kept a printout with the desired pattern and wordings. (We took it out during the cake cutting 😊). And added some sugar candy cubes on top of the cake next to the Jack daniels bottle to look like ice cubes  and the bottle. 

Coffee cake:

Strong Coffee- ½ Cup (chilled)

Instant coffee powder (optional but I strongly recommend adding this)- 2 tsp

Brown Sugar – 1 ½ Cup

Butter – ½ Cup (Room Temperature)

Oil – ½ Cup

Vanilla Extract – 2 Tsp

Egg – 6

All-purpose Flour - 3 Cups

Baking Powder- 3 Tsp

Salt- a good pinch

 Method:

Mix softened butter and granulated sugar, make sure they are thoroughly combined.

Add oil to this and mix well

Next add eggs one at a time

Now add Vanilla extract, mix thoroughly.

Sift together flour, baking powder, instant coffee powder and salt.

Add 1/3 of the flour mixture and ½ of the chilled coffee to the liquid mixture.

Mix well and continue alternating adding in the flour and the coffee until everything is mixed well.

Add the batter to two 9-inch round cake pan.

Place in the oven and bake at 170-180 Degrees C.

Bake for 40-45 minutes or until a toothpick/skewer inserted comes out clean.


Caramel Frosting: 

Brown Sugar – 2 Cup

 Butter – 1 Cup, cubed

 Milk – ½ Cup

Icing Sugar – 3 to 3 ½ Cup 

Method:

In heavy saucepan, combine the brown sugar, butter and milk.

Cook and stir over a low heat until the brown sugar is dissolved.

Increase the heat to medium. Do not stir.

Cook for 3-6 minutes until either bubbles form in the center of the pan or the mixture turns amber.

Remove from the heat and transfer the caramel mixture to a small bowl.

Cool to room temperature.

Add caramel mixture to a mixer.

Gradually mix in powdered sugar until combined, creamy and the correct consistency. 

Chocolate fondant:

White marshmallow – 200gm

Icing sugar- 320 gm

Cocoa powder – 80 gm

Butter – a little

Water – 15 ml


Method:

To melt the marshmallows properly, take a bowl and grease it with a little butter. Add the 15 ml of water and the marshmallows and heat them for 2 to 3 minutes, depending on the power of your microwave. Watch them closely to prevent burning!

When the marshmallows are ready, stir it with a spoon or spatula, making sure it doesn't stick to the sides of the bowl. Then, add the cocoa powder and mix it with the marshmallows.

Once you've thoroughly mixed the cocoa powder with the marshmallows, you can gradually add the icing sugar. (You may not need the entire icing sugar)

Now, mix the icing sugar with a spoon or spatula. When the chocolate fondant acquires the proper consistency, remove it from the bowl and begin to knead with your hands.

Don't forget to sprinkle icing sugar on the surface where you knead the dough to prevent it from sticking and put a little on your hands as well.

You'll know the chocolate fondant has acquired the proper texture and consistency when it stops sticking to your hands. Then, make it into a ball and cover it with plastic wrap in the bowl you previously greased with butter, adding a little icing sugar to prevent the fondant from sticking. Chill the dough in the refrigerator for 24 hours.

After 24 hours, remove the chocolate fondant from the refrigerator and knead it again. If you notice that the dough has hardened too much, don't worry, just put it in the microwave for a few seconds to soften it.

Add white fondant and chocolate fondant together until you get the desired brown colour for you barrel.


Assembling the cake:

cut the cakes horizontally into 2 parts. Sandwich these slices with the prepared caramel frosting. once 4 pieces are stacked together crumb-coat with remaining caramel frosting.  keep the cake in the fridge for 1-2 hours. 

cut a 9-inch round fondant and keep it in the top of the cake.

Measure the height of the cake. with this measurement (may be little more to the actual height) cut a rectangular piece. With the wood stencil print the wooden pattern to the fondant. cut 1.5inch strips and attach it to cake. Complete the cake round like this. 

Once strips are added to the cake, add a small band in top and bottom of the cake to get the barrel look as seen in the picture.


Tuesday, 28 May 2019

Rainbow birthday party


This is my elder ones birthday party when she turns 6. She is turning 8 in 2 months and till now I couldn’t post this in my blog. I wanted to post it at least before she turns 8.


My girl ask me to prepare the rainbow cake for her 6th birthday and she gave the specification like ‘I want a rainbow cake and when I cut the cake I need M & M’s to come out from the cake’. I told her I’ll make rainbow cake for you and it’s so hard to do the other thing, so please spare me this time. I just want to give surprise for her. Luckily while making the cake she was busy with her friend and I managed to keep it as a surprise for her. After cutting the cake when she see the M&M’s her eyes was glowing and that made my day 


Rainbow Piñata Cake


4 packet of vanilla cake mix
Rainbow food colours
M&M : Multi colours


Filling and crumb-coat:

Chocolate Ganache frosting:
250g dark cooking chocolate chips
1/3 cup cream


Method:
Using the 4 packet of vanilla cake mix I made 6 8inch cakes. Make the batter as per the instructions given in the box(While making the cake batter I replaced the butter with oil (canola, vegetable or rice bran oil). This will make the cake moist and soft. ). Divide the batter into 6 equal parts and add food colour to this batter to make it rainbow layers( Violet, Blue, Green, Yellow, Orange and Red colours). Bake these cake as per the box instruction. Once the cakes are cooled, level the cakes. Cut the edges of the cake so that it gives the bright colour when we cut the cake. (Save these crumbs to make cake pops)


Except the Violet and Red cakes(the first and last layer ), cut a circle out of the centre using a round cookie cutter(2.5-3inch) 
I made Swiss meringue butter cream as the filling and for crumb coating the cake.

In the cake board centre put a spoon of butter cream and place the Violet cake layer in that. It will help the cake to be in place. Add the buttercream on to of this layer and level it evenly. Place Blue layer cake on top of it. Layer it with buttercream and place the Green layer cake on top of this. (NB: the hole in the cake layers should be aligned). Repeat the same for Yellow and Orange layer too. On top of Orange layer add buttercream icing and the pour rainbow colour M&M’s into the hole till the hole fills. Place the last cake layer, Red cake, on top of this. Cover the cake with buttercream and keep it in fridge till the ganache is ready. 


Combine chocolate and cream in a heatproof bowl over a saucepan of simmering water. Stir with a metal spoon until smooth. Remove bowl from heat. Set aside at room temperature to cool, stirring occasionally, until ganache is thick and spreadable.(this can be done in microwave too by heating the fresh cream and add this hot cream over the chocolate chips. Let it sit for a minute. Stir it well. If chocolate lumps are there, microwave the mixture for 30 sec. Make sure the chocolate won’t get burnt while  heating.)When the ganache is cooled, pour the chocolate ganache over the cake. Once the ganache is a bit set decorate the cake with M&M’s. 


Rainbow cake pops


Gather all the cake crumbs and mix it very well. Add 3-5 Tbsp buttercream to this mix so that it will be easy to hold the crumbs together. Make small balls of this mix. Melt white chocolate chips in microwave. Dip the ice-cream cone in this mixture and place the cake balls in this ice-cream cone. Dip the cake pops in the melted chocolate mix and roll it in the rainbow sprinkles. Keep this straight until the chocolate set


Rainbow jelly


Jelly mix- 6 packet (of different colours)
Condensed milk- 1 can
Gelatine – Tbsp
Mould to set the jelly(I use a plastic container which is deep enough)

Lightly spray the mould with cooking oil. Prepare the purple jelly mix by adding the jelly mix and 1 cup of boiling water in a heatproof bowl. Stir until the jelly dissolves and no lumps should be there. Pour this mixture to the prepared container. Chill this for an hour or until this layer sets completely. 

Prepare the white layer: Sprinkle gelatine over 1/3 cup water and leave it aside for 5 minutes. Add 1 Cup boiling water to this gelatine mix and stir well until gelatine melts. Add 1 can condensed milk and this gelatine mixture in a heatproof(microwavable) bowl. Once this mixture cools to room temperature pour 1/5th of this over the chilled purple layer. Keep it in fridge till this white layer sets completely.
Repeat the same for blue, green, yellow, orange and red jelly mixture. Add white layer alternatively. If the condensed milk mixture sets in between, microwave this for 30 secs. Give a good stir.(do not boil this mixture and make sure this comes to room temperature before adding to the chilled jelly layer)

Once the red layer also done, chilled the mixture overnight . Before inverting the mould, place this container in hot water for 1 min and invert the mould carefully into the serving plate. Cut in any shape and serve. I can guarantee, along with kids, adults will also enjoy this.
Unfortunately I forgot to take a photo of the whole jelly. I was busy setting up the party table and I cut the jelly into bit size pieces so that it will be easy for the kids to eat. 


Fairy Bread


White bread slices, with sides trimmed
Spreadable butter
100's and 1000's sprinkles

Spread butter in the bread slices.
Sprinkle 100’s and 1000’s over that.
Cut into triangles-or any fun shape- to serve.


Monday, 18 December 2017

Christmas Plum Cake


Ingredients


For Soaking:
Mixed fruits – 2.5 cups
Rum/Brandy - 1 cups
For Caramel:


Sugar - ½ cup
Water - 1 tbsp
Warm water - ¼ cup


For Cake:


Plain flour (maida) - 2 cups
Baking powder - 1¼ tsp
Baking soda - ½ tsp
Brown Sugar - 1 cup (You can replace this with regular white sugar)
Unsalted Butter - 250 gms  @ room temp
Eggs - 4 @ room temp
Vanilla essence - 2 tsp
Jam - 1 tbsp
Cashew- 10-20 pieces(optional)


For Spice Powder:


Cloves - 2
Cardamom – 2
Bayleaf -1
Cinnamon - a small piece
Nutmeg - a small piece
Sugar – 2 tsp

Method:


Soaking of Fruits
I used a combination of sultanas, currants, tutti frooti, prunes, dates  & candied orange & lemon peel. If you are using apricots, prunes etc., chop it into small bit size pieces & soak it. For the first batch, I soaked it for 2 weeks only.  Try to soak it for a at least 1 week. Shake or stir the jar/container of soaked fruits once in a while.
 

Caramel Preparation:
Combine ½ cup sugar & 1 tbsp water in a sauce pan. Heat it & let the sugar melt. When the color of the melted sugar becomes dark brown, remove the pan from fire & add ¼ cup hot water to this. You need to be very careful at this stage since the water tends to splash & can cause burns. Bring it back to the heat & boil for a few more mins, 3-4 mins. Remove from fire & let it cool completely.


Spice Powder:
Grind all the spices and sugar to a fine powder & keep aside.

Cake Preparation:
Preheat the oven @ 180 C for 10-15 mins, before baking.

Drain the soaked fruits & keep aside. Retain 2-4 tbsp from the drained liquor. Toss the drained fruits in 2 tbsp of flour. (This will prevent the fruits from sinking to the bottom of the cake).

Sift the plain flour with baking powder & baking soda. If using white sugar, powder the sugar & keep aside(If using brown sugar this step can be omitted).

Separate the yolks & white of the eggs. Beat egg whites till soft peaks form. Keep aside. Beat the egg yolks & add the softened butter to it. Beat it till it forms a smooth paste. Add powdered sugar to this, gradually. Beat after each addition. When it becomes smooth add vanilla essence & cooled caramel & spice powder & beat again. Add the sifted flour in 2 batches. Beat after each addition. Add jam & combine.
Fold in the beaten egg whites in 2 parts & combine till no white streaks are visible. Fold in the soaked fruits & 2 tbsp of retained liquor.


Grease the baking dish & line with baking paper. Pour the batter into the prepared tins. Decorate it with cashew and bake in the pre heated oven for 45-50 mins or until the skewer inserted comes out clean. The baking time can vary depending on the oven & also the size of the tin used.
Using this batter I made 2 rectangle cakes and an 8" round cake.


Wednesday, 22 November 2017

Baby Shower Cake -3 ( Bumble Bee theme)

The bee cake I made for my friend's Baby shower. The baby is 10 months old now ☺☺☺

Its always better to be late than never right???? It's been quite long since I ever come to my facebook page or blog. My apologies for  that.


I made two 9 inch vanilla cake sandwiched together with Swiss-meringue butter cream (I made 1/3rd quantity). Crumb-coat the sandwiched cake with the remaining butter cream and covered with fondant.


Tuesday, 15 August 2017

Ladybug Birthday Cake

Ladybug birthday cake for my cuties 1st birthday


I made vanilla cakes sandwiched with Swiss meringue butter cream and covered them with pink and green fondants. For the lady bug, I baked cake in a bowl so that it was easy to get the shape.


Wednesday, 1 March 2017

Baby Shower Cake-2


Baby shower cake I made for 2 lovely ladies. Pink, Blue and Yellow were the theme colors.

I made 4 batches of  my favorite chocolate cake and bake it in 2 rectangle pans (9*7.5 inch).(I cut the edges and the top to make it flat and keep it aside to make cake pops.)
Sandwiched them together with the most delicious Swiss-meringue butter cream (I made 1/3rd quantity). Crumb-coat the sandwiched cake with the remaining butter cream.


Pink and blue marshmallow fondants are made and decorate the cake with that.


Bed rails:
Measure the length, breadth and height of the cake. With this measurements, draw the bed rails in a paper and place a butter paper above this sheet so that the drawing is visible. This will make it easy to make the bed rails.
Put some dark chocolate in a sip-lock bag and microwave it till it melts. Seal the bag and make a small cut at the bottom corner and trace the bed rails over the butter paper.


Leave it to dry. Once the rails are half set put it in the cake.


Now I need the yellow element in the cake. For that I covered the babies with yellow fondant 😉.


To the crumbs I got by cutting of the edge and top of the cake, I added some buttercream and made some cake pops for the kids and they all loved it😋.


Monday, 22 August 2016

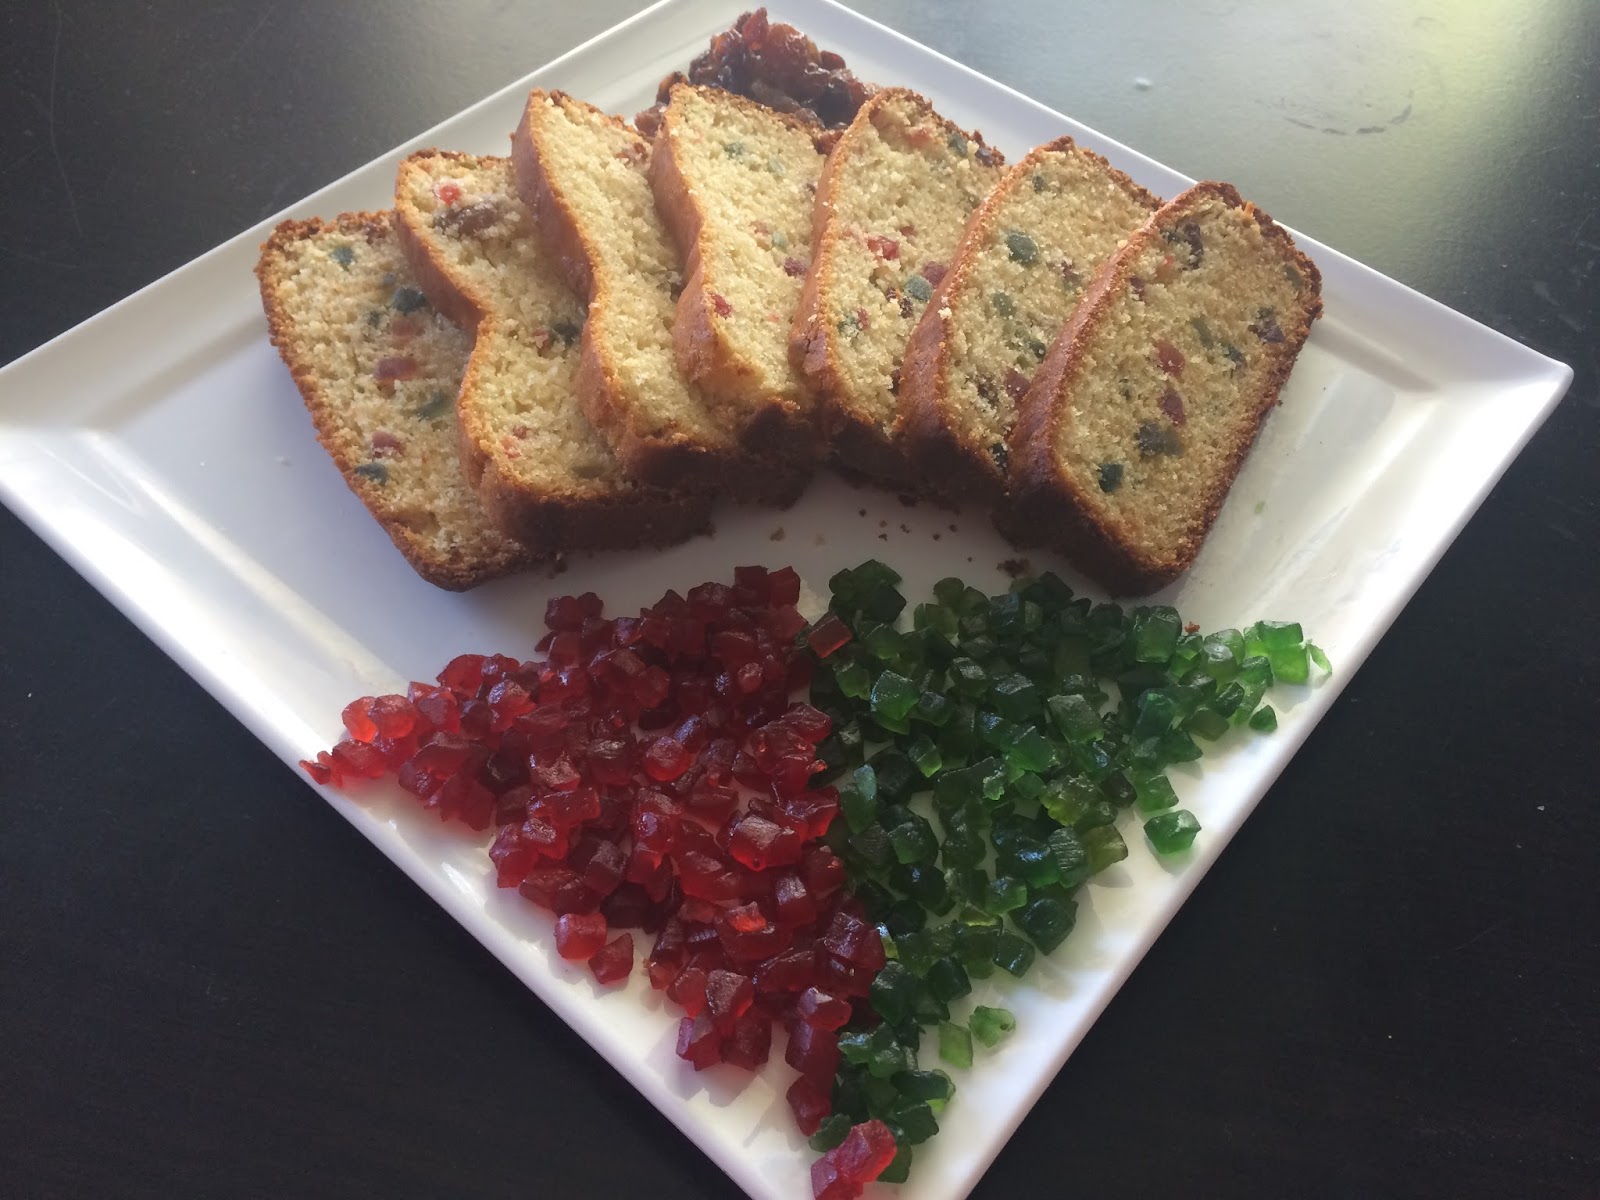
Tutti Frutti Bread


Ingredients

Self Raising Flour: 1 Cup
Wheat Flour: 2 Tbsp
Fine semolina (Rava): 1Tsp
Milk Powder: 2 Tbsp
Corn Flour: 1 Tsp
Pinch of salt (if using unsalted butter)
Sugar: 1/3 Cup
Butter (at room temp): 80gm
Yogurt(lightly beaten) : 1/2 Cup
Sweetened condensed milk: 1/2 Cup
Baking Soda: 1/2 tsp
Tutti Frutti : 1/2 Cup (different colors)
All purpose flour : 1 Tbsp (for coating the tutti frutti)
Rasins/Sultanas: 2 Tbsp
Vanilla Essence : 1 tsp
White vinegar: 1 Tbsp

Yellow Food Color (optional)


Method:

Preheat oven to 180 degrees Celsius. Prepare a loaf tin by spraying oil/butter on it and dusting with flour.

Sift together the dry ingredients- self raising flour, wheat flour, semolina, corn flour, baking soda and a pinch of salt. Mix well.
Take a big mixing bowl and add butter, condensed milk, sugar, yogurt, vanilla essence and mix it well until it forms a creamy texture.

Now sprinkle some plain flour over the tutti frutti and spread it well (Dusting the tutti frutti with some flour before incorporating them into the batter helps in even distribution preventing them from sinking to the bottom of the cake).


Now add the dry ingredients to the wet mixture. Mix very well. If the batter is too thick, add little milk. Add tutti frutti and raisins and then add white vinegar and then mix it well. Add food color if using.

Pour the batter into the prepared loaf tin and tap well. Bake in the preheated oven for 30 to 40 minutes. The top needs to turn golden brown and a toothpick inserted in the center should comes out clean. Allow the cake to cool for 1 hrs then slice.


Friday, 19 February 2016

Princess Cake- Birthday cake for my Little Princess

(Birthday Cake for my 4 yr old girl)


Ingredients for an 8” cake

Sugar : 1 Cup
Egg : 2
Plain Flour: 1 ¼ Cup
Milk : ½ Cup
Vinegar : ½ tsp
Oil : ½ cup
Baking Powder : 1 ¼ tsp
Baking Soda : ½tsp
Vanilla Essence : 1tsp


Method:

Preheat oven to 350 degrees F (180 degrees C).
Grease the bottom and the sides of the pan well.Line it with baking Paper

Mix milk and vinegar together and keep it aside for about 5-10 min. 
In a large mixing bowl, with an electric mixer, beat sugar and eggs together until slightly thickened, about 1 minute. Add flour, milk, oil, baking powder, baking soda and vanilla and beat for another minute, just until the batter is smooth and creamy. Don't over-beat. Pour batter into the prepared baking pan.

Bake in preheated oven for 30 to 40 minutes or until the tops are golden and a toothpick poked into the center of the layer comes out clean. Loosen the sides of the cake from the pan with a thin knife, then turn out onto a rack and peel off the paper. Let cool completely before covering with frosting.

I made 4 batches of cake mix and pour it in 1 tall 8” pan, 2 normal 8" pans and one oven-safe bowl. The baking temperature for the bowl was less than 170 C and I baked it for almost an hour so that it get cooked correctly.

Turn your cakes out of their baking dishes and allow to cool completely (warm cakes will melt the buttercream).
                 
Using  a round cookie cutter  cut a circle out of the centre of all of these cake layers (Based on the height of the Doll. For me the I didn’t cut the bottom layer so that the dolls leg rest on the cake itself not on the tray).

Take your doll and tie the hair high so it won’t touch the cake and get disturbed while doing the doll’s skirt.  Surround the legs of the doll in plastic wrap and put her hand up.


Swiss Meringue Buttercream   (About 10 cups of buttercream)

Ingredients

Ingredients
fresh egg whites : 10 large  (300 g)
Sugar : 2 ½cups (500 g)
Unsalted butter, cut into cubes ( cool, but not cold) : 3 cups (680 g)
pure vanilla extract : 1.5 Tbsp
pinch of salt


Method:

Wipe a heat-proof bowl with paper towel and lemon juice, to remove any traces of grease. Add egg whites and sugar, and simmer over a pot of water (not boiling), whisking constantly but gently, until temperature reaches 160°F (If you don't have a candy thermometer, until the sugar has completely dissolved and the egg whites are hot).

With whisk attachment of mixer (or a hand held mixer), begin to whip until the meringue is thick, glossy, and the bottom of the bowl feels neutral to the touch (this can take up to 10 minutes or so).

Don't add butter until the bottom of the bowl feels neutral, and not warm. Switch over to paddle attachment and, with mixer on low speed, add butter cubes, one at a time, until incorporated, and mix until it has reached a silky smooth texture (if curdles, keep mixing and it will come back to smooth).

If mixture is too runny, refrigerate for about 15 minutes and continue mixing with paddle attachment until it comes together. Add vanilla and salt, continue beating  on low speed until well combined.


Ingredients  for the Filling

Pineapple – cut into small pieces . (I used canned pineapple)
Whipping cream –1½-2 cups

Method:

Cook the pineapple by adding sugar syrup little by little. (if using fresh pineapple add sugar based on the sweetness of the pineapple). Add sugar too if the pineapple are not sweet enough. Once its soft and cooked properly, remove from heat and allow it to cool.
By the time whip the cream by adding 1-2 tbsp powdered sugar. Once the pineapple is cooled completely fold it to the whipped cream.


Assemble the Cake:

To construct the cake, first brush each layer with sugar syrup (I used the leftover syrup from the canned pineapple) before you place the filling  between the layers and stack. (Add a thick layer of filling between these cake layers)

Make a very thin ‘crumb coat’ of buttercream on the outside of the cake and place it in the fridge to harden – this will help the piped buttercream to stick to your cake. Do not worry too much if it is not perfectly smooth or beautiful looking just do your best.  Place in the fridge to firm up.

Carefully place the doll in the hole made in the center of the cake and do the rest of the icing . I did roses throughout the skirt and I preferred purple colour as that’s my little princess’s favourite colour. :) (even though I couldn’t find the exact purple colour she like, she was really happy with the colour and the cake I made . ;) )